
Release 24.06.5
Date: 06/26/24
Summary
This release continues the multi-phase effort to optimize the LinkLive.app user experience for call center agents, supervisors, and enterprise users. This release adds the ability to search for Contacts from the Communications Center Search. With this, many users will now choose to hide the Contact directory panel on left-hand side of LinkLive.app to simplify their user experience and increase the screen real estate for other panels.
This release also streamlines Transfer workflows and adds new transfer capabilities including
direct transfers to voicemail and Transfer Shortcuts, which are one-click, predefined Transfers for commonly used transfer types and recipients. Note that the workflow for Supervised Transfers has changed as detailed below in the Transfer Workflow Section.
Lastly, Voicemails are now shown in the Conversation History widget, which will make it much easier for users to be aware of new voicemails and quickly listen to them.
Videos are provided in each section below for a walkthrough of select new features:
Updates
Contacts Search
The Communication Center Search has been expanded to include Contact searching in addition Conversation History search. With the addition of the Contacts search, most users will choose to hide the Contacts panel by clicking the Person icon to the left of the search. The search input defaults to the History and Contacts search mode as indicated by the BLUE phone icon. In this mode, users can enter contact names or keywords to search for contacts, as well as participants and transcripts of historical conversations. Once the Contact search results are shown, users can click a Contact to see the same choices as the contact list, e.g. Start Messaging, Start Voice Call, Send Secure Mail, etc.
The Search bar is also used for outbound dialing to an external phone number. To toggle to Outbound dial mode, the user clicks the phone icon to turn it RED and the Call Button Appears. They can now type in a phone number and hit Call to place the call. The user can hit X to clear the number or click the phone icon to toggle back to Contact and History mode.
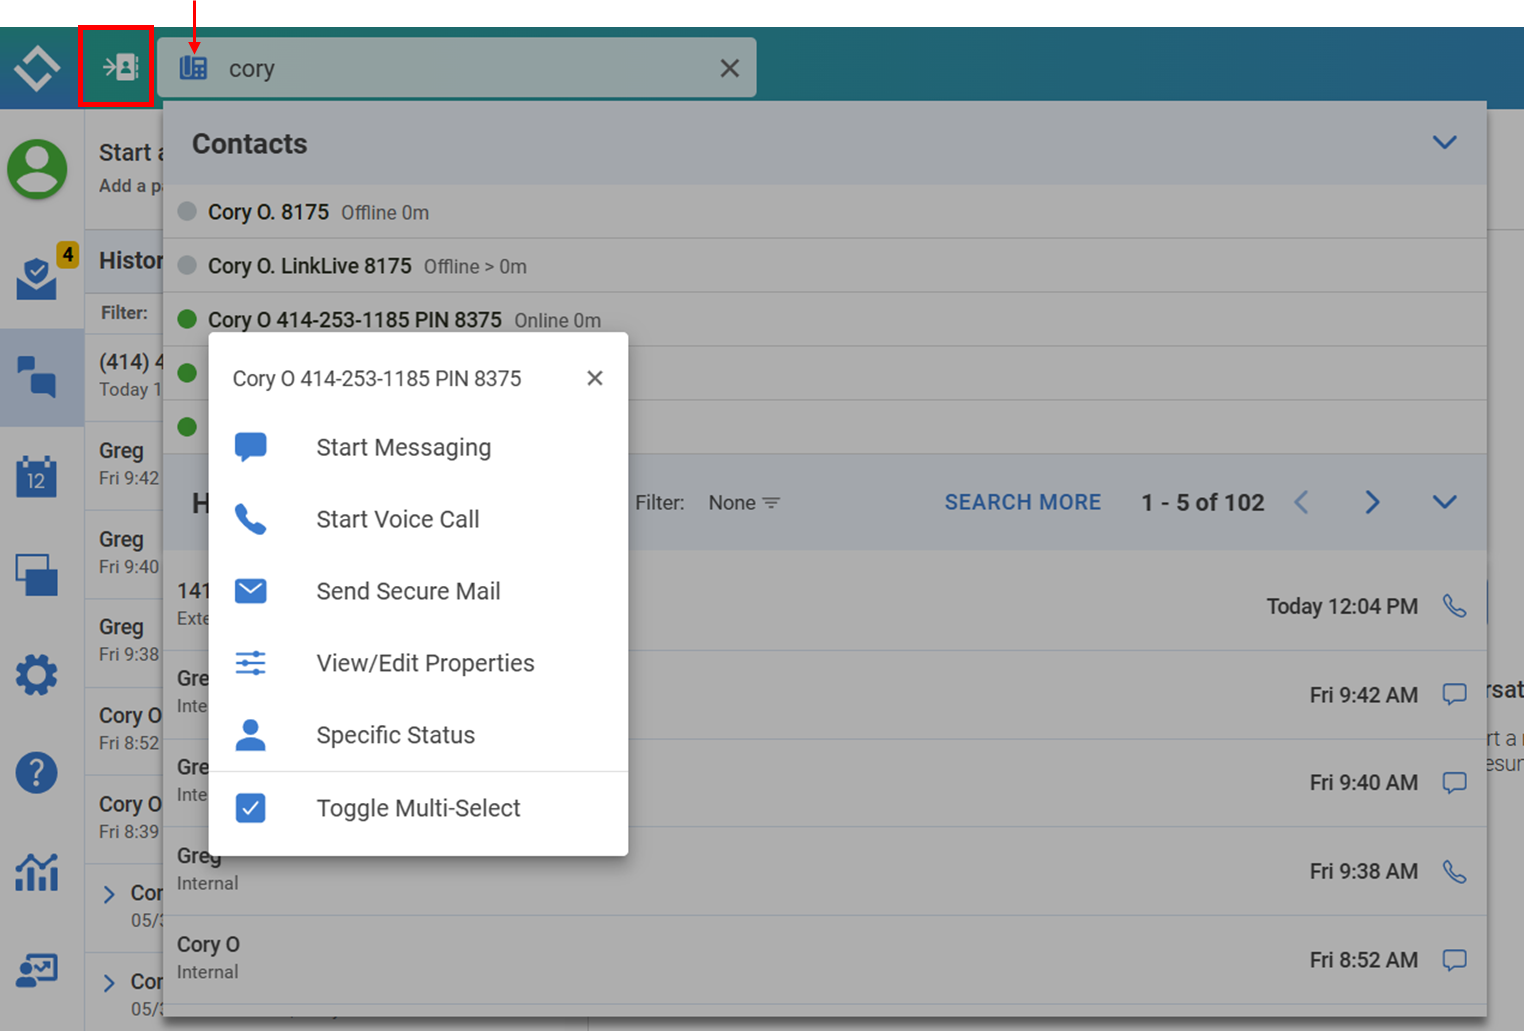
Search: Contact and History Mode with Contact Panel Hidden
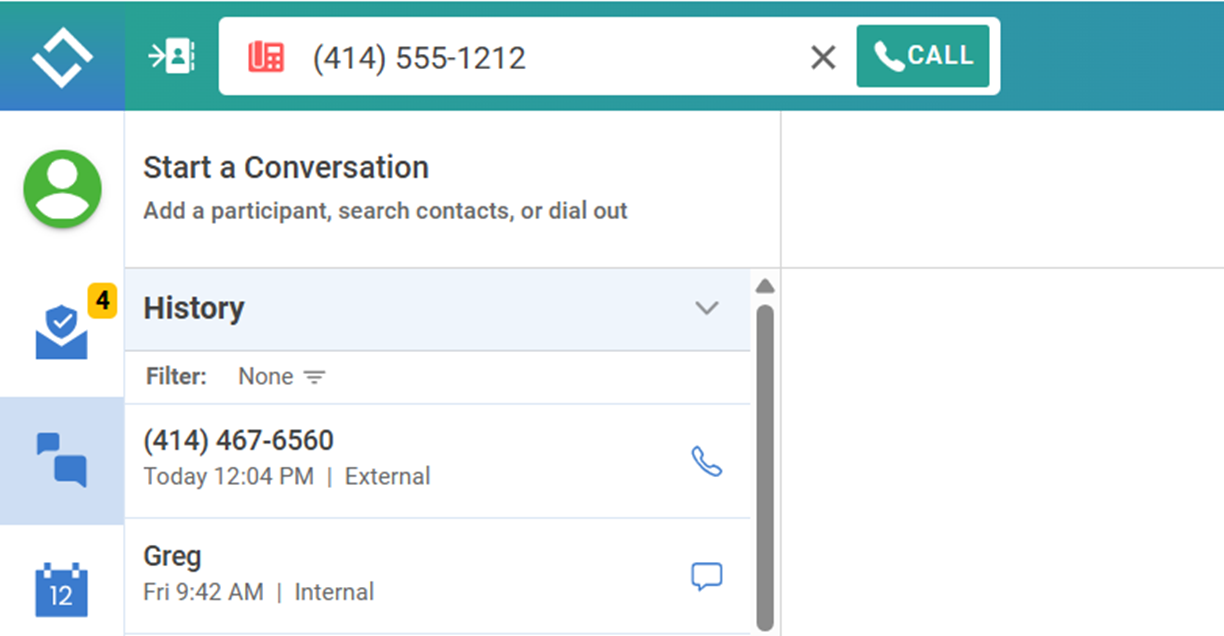
Search: Outbound Dial Mode
Communications Seach Center:
Build Number: LinkLive.app 24.06.2
Transfer Shortcuts
Transfer Shortcuts allow users to set up predefined transfers to a specific recipient for a chosen transfer type. Once set, the Transfer Shortcut is executed via a one-click transfer within the Transfer Modal. Transfer Shortcuts can be set up globally on the server by a LinkLive Administrator. Users can set up their own personal Transfer Shortcuts in the Settings > Shortcuts > Transfers List page. Also, Transfer Shortcuts can be created during the Transfer Workflow using the + icon next to the Search Text Box.
On the Transfers List page, users view the shortcuts they have created, My Transfers, and globally created Shortcuts, Shared Transfers (which are not editable). The search allows users to quickly find a shortcut from long lists. Users can add, delete, or edit shortcuts as well as reorder the shortcut list.

When adding or editing a Transfer Shortcut, there are four transfer types, Add & Drop, Blind, Conference, and Supervised. Note that Add & Drop and Conference Transfers are only available as Shortcuts and will not be shown as Transfer buttons during the Transfer Workflow.
The behavior of the four transfer shortcuts is shown below. These definitions are easily accessible from the ? icon on the Shortcuts page or the Transfer Workflow. Note that Blind and Add & Drop Transfers are only applicable to voice calls. If a user is trying to transfer a chat message, Transfer Shortcuts defined as Blind or Add & Drop will not be visible during the Transfer process.
Note that the workflow for Supervised Transfer has changed. Supervised Transfers require users to click Merge to combine all the parties after the user and transferee have connected.
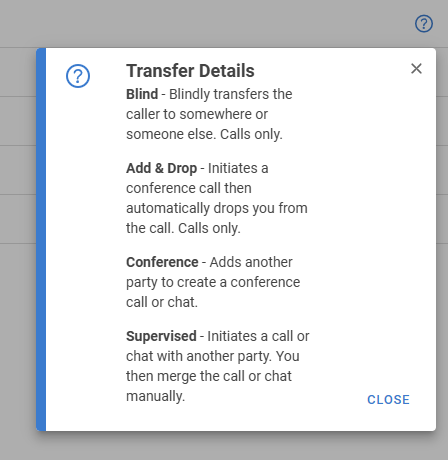
Transfer Types
New Transfer Shortcuts:
Build Number: LinkLive.app 24.06.2
Transfer Workflow Updates and new Transfer Types
During a Chat or Voice conversation, users click on the transfer icon and are presented with the redesigned Transfer Modal for either Voice or Chat.

Chat: Transfer Icon
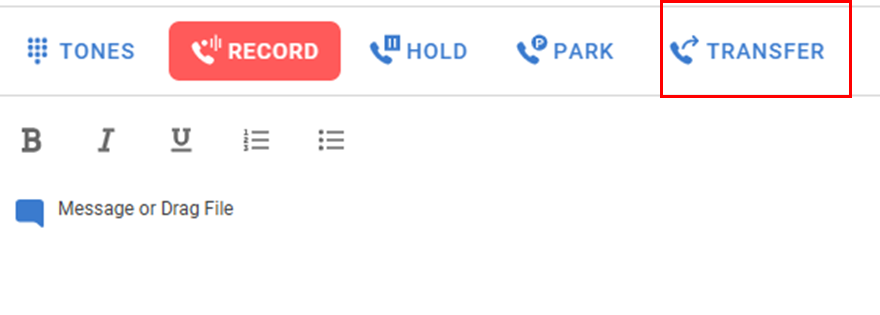
Voice: Transfer Icon
The Transfer Modal displays Transfer Shortcuts and allows users to search for a contact or enter a phone number/extension for a transferee. Note that the + icon to the right of the search allows users to create a Transfer Shortcut during the Transfer Workflow. The ? icon displays online help definitions of the various transfer types.
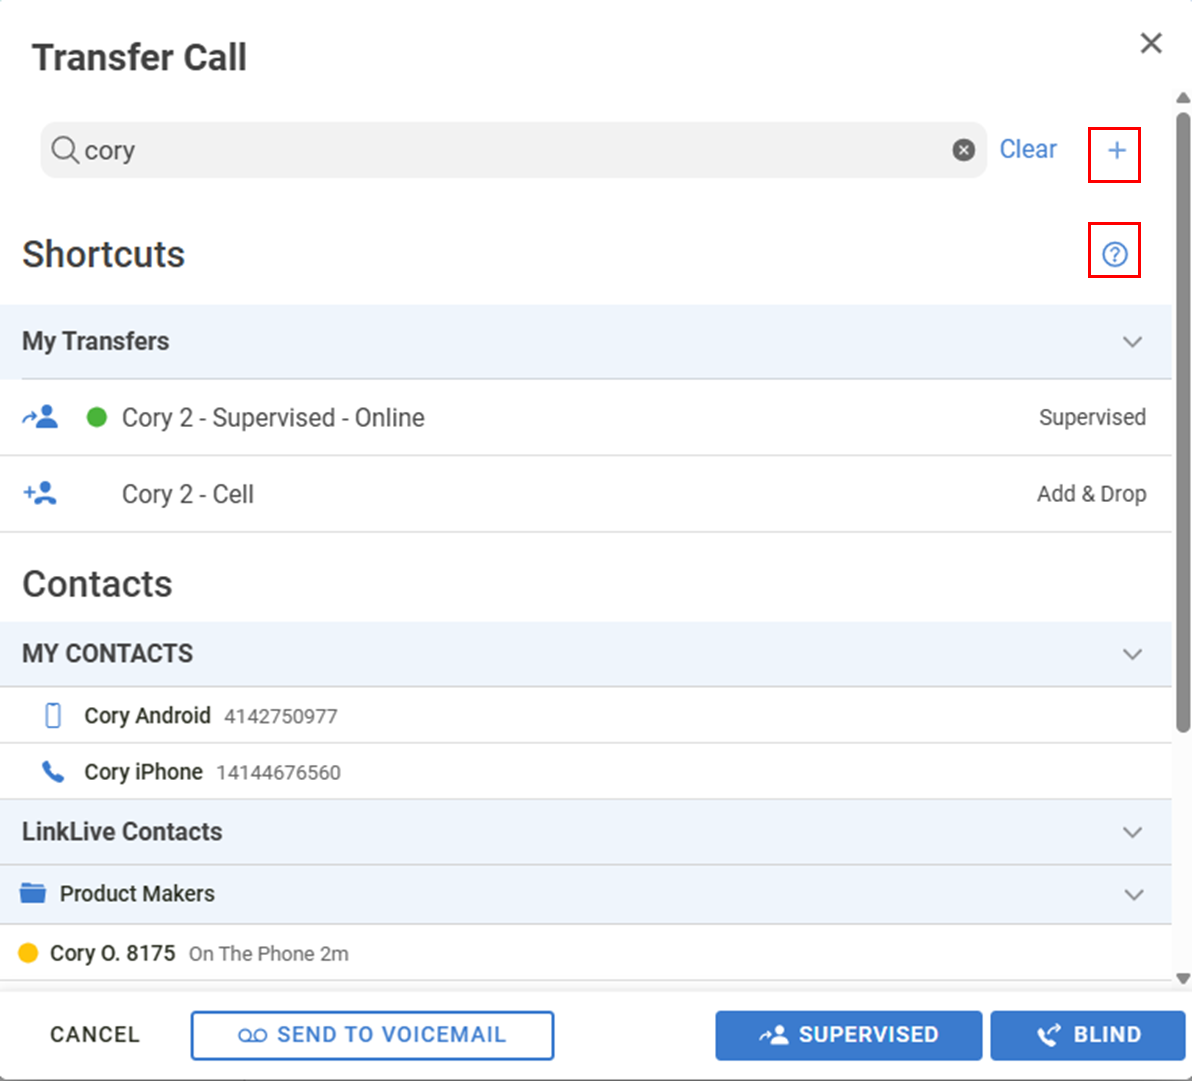
Transfer Modal
Transfer Shortcuts
If a user clicks on a Transfer Shortcut, the Transfer is immediately executed using Transfer Type and Contact, Phone Number, or Extension defined in the Shortcut
Entering a Transferee
If a user does not use a Transfer Shortcut, they can enter a Contact, Extension, or Phone Number, click the Contact, and select the desired Transfer type. For Voice Calls, users can perform a Blind Transfer, Supervised Transfer or Send to Voicemail. For Chats, users can perform Supervised Transfers. Note that Add & Drop and Conference transfers are only available if defined in a Transfer Shortcut.
Transfer Types
Send to Voicemail
Send to Voicemail will directly send the caller to the transferee voicemail and drop the user from the call.
Blind Transfers
When a user initiates a Blind Transfer, the caller is transferred directly to the transferee and the user is immediately dropped while the Transfer and caller stay in the session.
Supervised Transfers
When a user initiates a Supervised Transfer for a voice call, the user is placed on hold and the transferee is called in a separate voice session. To complete a Supervised Transfer of a chat, a separate chat session is created for the user and transferee while the initial chat conversation remains open. In either case, the user can see in the Conversation Panel that two separate sessions have been created. This allows the user and transferee to communicate before merging in the caller (chat initiator). Also, the user can end the session with the transferee in cases where they do not respond or the user needs to transfer to a different transferee. To merge the sessions so that all parties are in the same conversation, the user clicks the red MERGE button. This will take the caller off hold and merge into a single session in the Conversation Panel. The user can drop from the merged conversation by ending the Conference, at which point the transferee and caller / chat initiator will remain in the session.
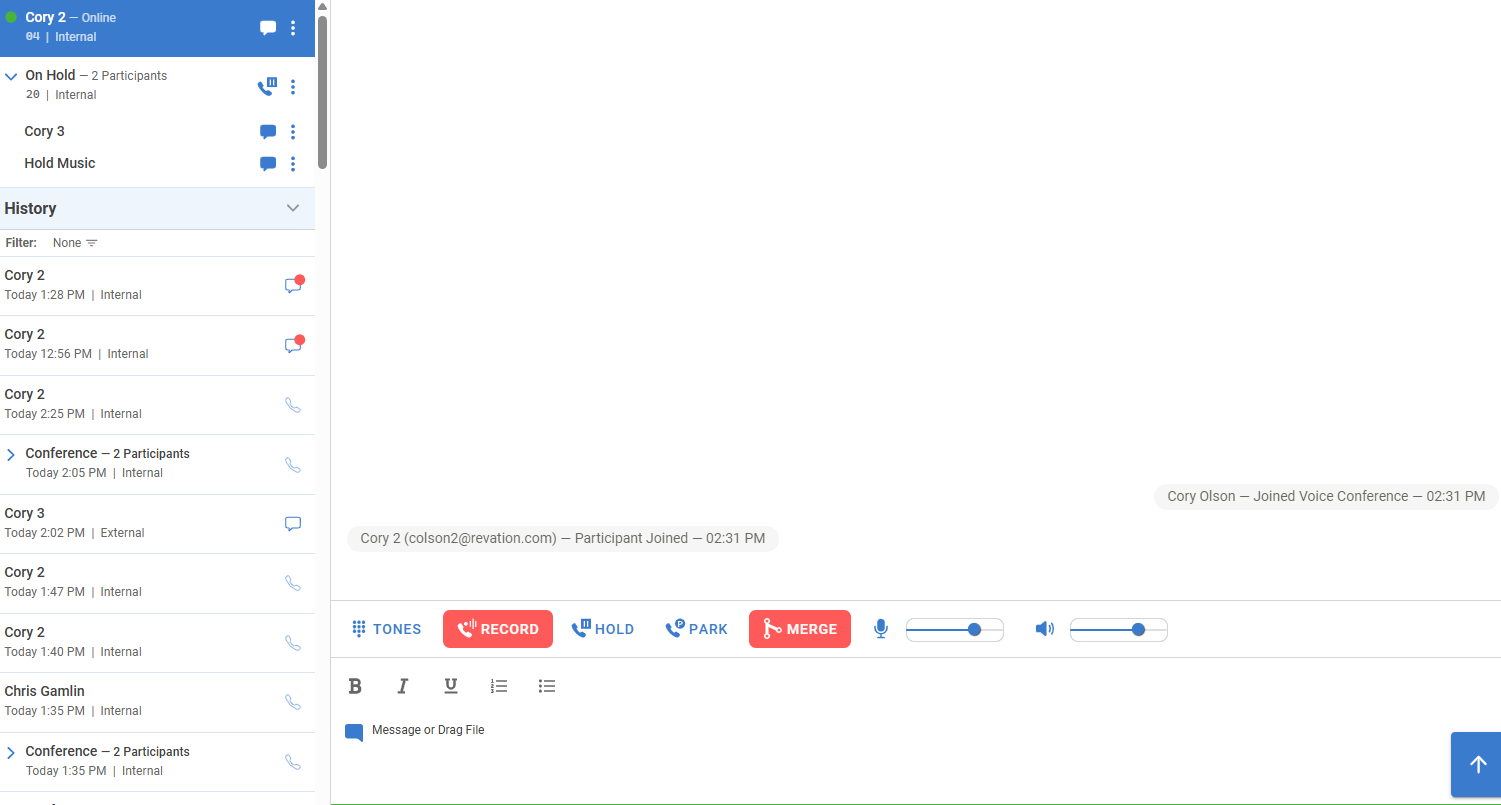
Supervised Transfers with Merge Button
Revised Transfer Process:
Build Number: LinkLive.app 24.06.2
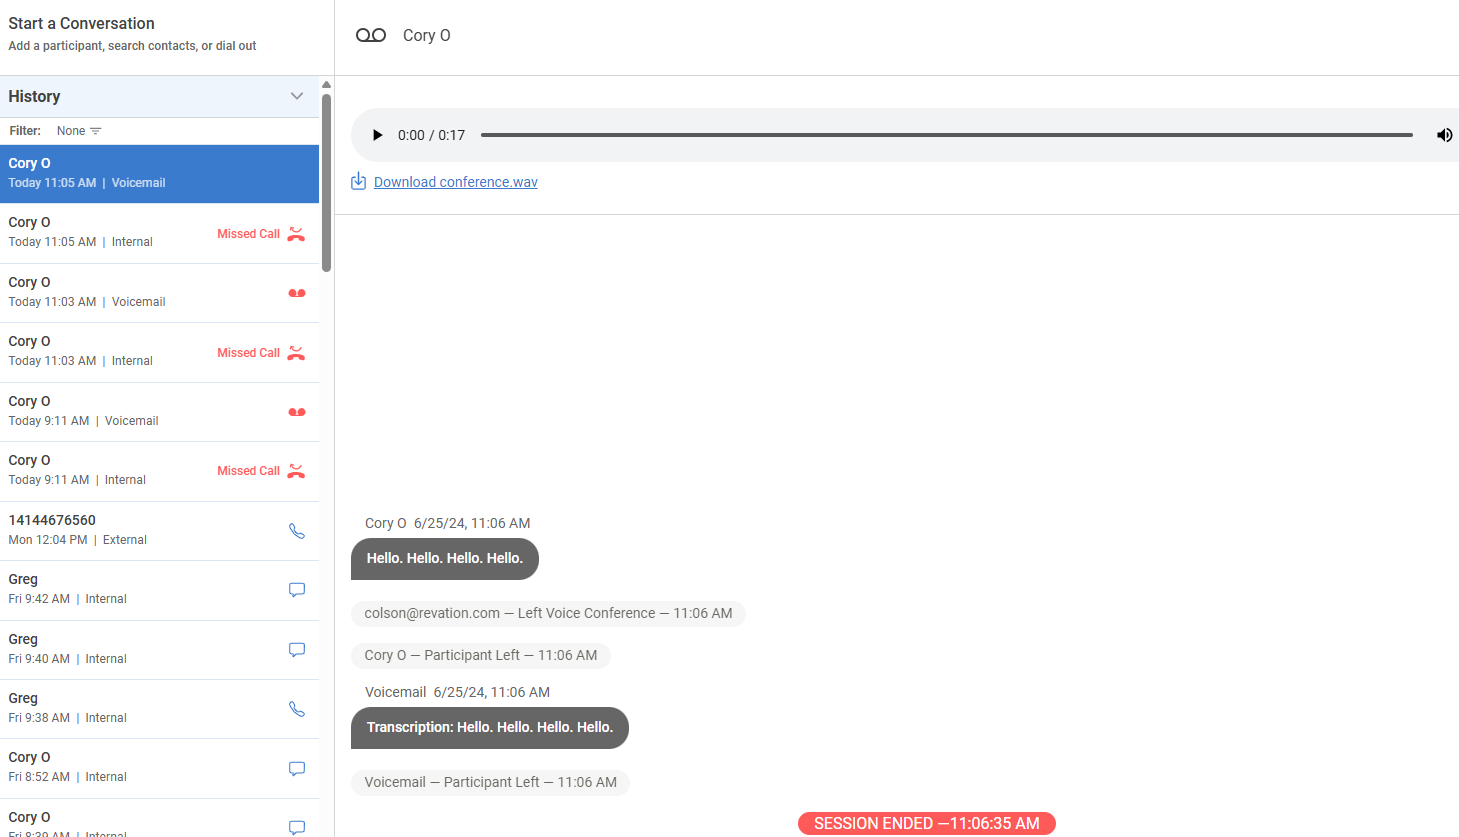
Voicemails in Conversation History
Voicemails are now shown in the Conversation History Panel. This capability increases awareness of new voicemails, simplifies searching for previous voicemails, and streamlines listening or downloading voicemails. When a user receives a voicemail, they first see an inbound call notification, which updates to a Missed Call notification when the call is transferred to Voicemail. Once the voicemail is left by the caller, the user will see a Voicemail in the Conversation History as well as a Missed Call. To aid searching, a new History Filter allows users to select what type of Conversations they view in the History. A user can tap a Voicemail to view the Voicemail Transcript and listen to the voicemail or download the voicemail recording.
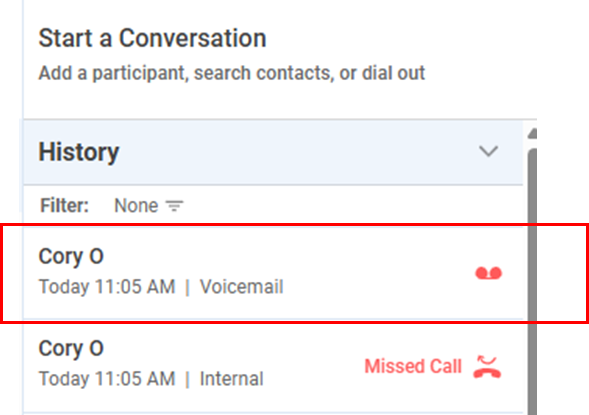
Voicemail in Conversation History
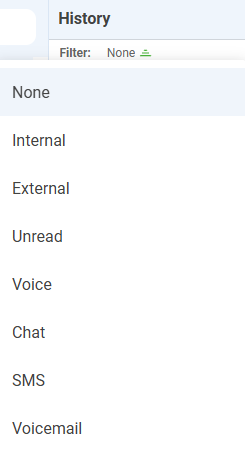
Conversation History Filters
Voicemail Transcript
Build Number: LinkLive.app 24.06.2
Numerous performance and bug fix updates